
How to Create a Facebook Ad Account
Leadsie Blog Article Content
Create a new Facebook ad account by going to Meta Business Suite’s Settings, open ‘ Accounts ’, then ‘ Ad accounts ’, click ‘ Add ’, and choose ‘ Create a new ad account ’. Set the name, time zone, and currency, then add a payment method before you run ads.
The rest of this guide walks through each step with screenshots, and it covers the part most tutorials skip: how to avoid the one setup mistake that forces a painful rebuild later. If your ad account ends up attached to your personal profile instead of your business, you can lose it, cap your spending, and orphan your tracking, so it is worth getting it right the first time.
What is a Facebook (Meta) ad account?
A Facebook ad account is the container where you build campaigns, set your billing, and see your reporting. Everything you spend and every result you measure lives inside it. You need one before you can run a single ad*.
Your ad account is not the same thing as your Facebook profile or your Facebook Page. Your profile is your personal identity, your Page is your business's public presence, and your ad account is the advertising engine that sits behind them. A Meta Pixel, the small piece of code that tracks what happens on your website, also connects to your ad account.
*Note: Meta automatically creates a personal ad account for first-timers (with no prior ad account) who boost a post. However, this is tied to their personal Facebook profile.
💡Pro tip: If you plan to advertise regularly, it is important to create a full-featured ad account under a Business Portfolio, not from your personal Facebook profile, as doing so limits your ability to collaborate with agencies, colleagues, or freelancers.
What you need before you start
Quick checklist:
- Personal Facebook profile (for login)
- A Meta Business Portfolio (create one if needed, using a business email)
- Facebook Page, or an admin/editor/advertiser role on one
- Payment method (card or PayPal)
How to create a Facebook ad account (step by step)
Step 1: In Meta Business Suite's Settings, look under' Accounts ' → click ' Ad accounts ', or go there directly @ https://business.facebook.com/latest/settings/ad_accounts.
Step 2: Click on either of the blue ' + Add ' button.
Step 3: From the options, select ' Create a new ad account.'
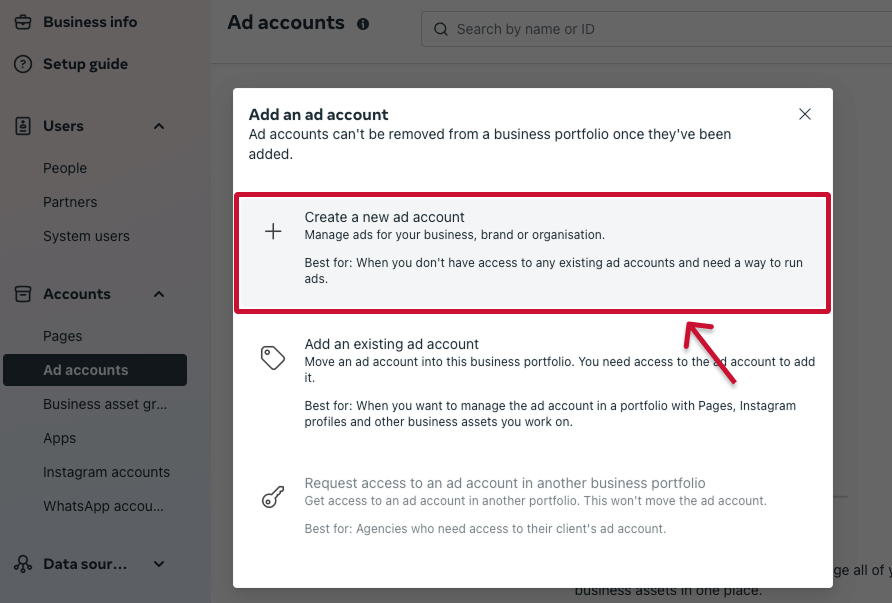
Step 4: Fill in details, such as ad account name, your time zone, and currency. Click ' Next.'
Step 5: Follow the on-screen prompts to declare usage and review the info and terms. Then click ' Create Ad Account '.
⚠️ Note: There are ad account limits per account. Once you create an ad account that's tied to a business portfolio, you cannot delete the ad account. However, you can close it and possibly reactivate it again in future. Read more about closing Meta/Facebook ad accounts.
Step 6: Now you have a Facebook/Meta ad account, but there's just one more step before you can start using it. Add at least one payment method to your Ad account when prompted to do so.
That is the core setup. Two details deserve their own attention, and they come next: the settings you cannot easily change later, and the payment step that quietly blocks your first campaign.
🔗 Related article: How to Request Access to a Facebook Ad Account
Desktop vs mobile
Set up your ad account on a desktop browser if you can. The full settings are easier to find and the menus are clearer.
You can create and manage ad accounts in the Meta Ads Manager mobile app, but the menu labels differ from the desktop version and some options are harder to reach. Use mobile for quick checks, not for first-time setup.
Choosing your name, time zone, and currency (get this right, it's permanent)
Choose your currency and time zone carefully, because they are effectively locked once the ad account is created. Changing them later usually means starting a brand-new ad account, so treat these fields as permanent decisions rather than defaults to rush past.
- Pick the currency you will actually pay in. Your billing follows this setting, and a mismatch creates accounting headaches every month. If your business banks in one currency, match it.
- Pick the time zone you report and schedule against. Your reporting days and your ad scheduling both run on this clock. If you manage the account from a different region than your business operates in, choose the one you will actually plan around.
- Name the account so it still makes sense if you add more accounts later. A clear naming convention, such as the business name plus the market or purpose, saves confusion once you are running more than one.
| Setting | What to choose | Why it matters |
|---|---|---|
| Currency | The currency you pay in | Billing follows it and it is hard to change later |
| Time zone | The zone you report and schedule against | Sets your reporting days and ad timing |
| Account name | A clear, scalable convention | Keeps multiple accounts organized |
Add your payment method and billing
Add a payment method before you try to launch anything, because no payment method means no live ads. Your account can exist fully set up and still refuse to spend until billing is attached.
How to add or edit a payment method:
- Go to Ads Manager.
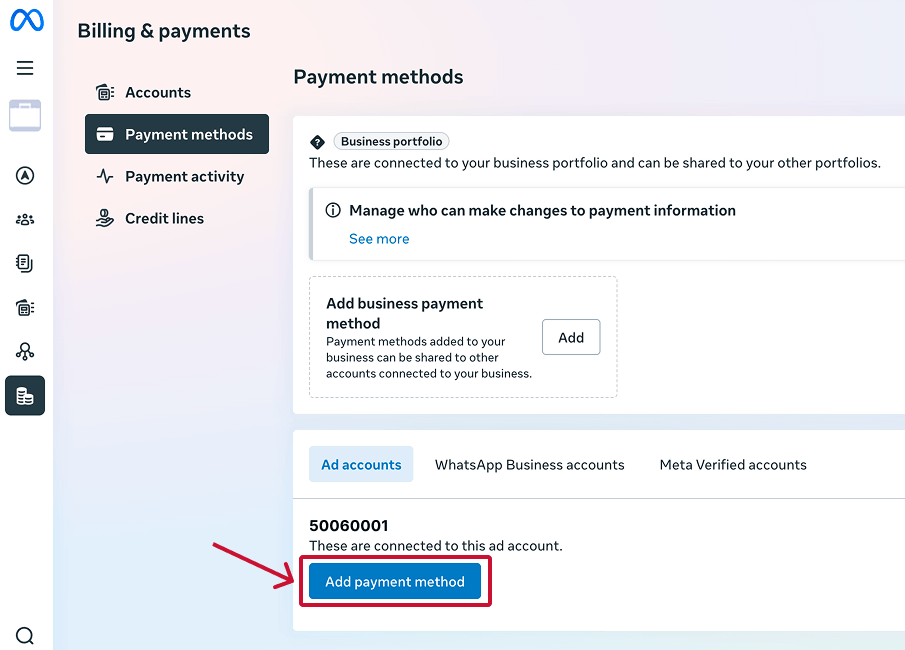
- Open ' Billing & payments' from the left-hand menu
- Click ' Payment methods '
- Under 'Ad accounts', click ' Add payment method ' and enter a card or PayPal.
- Save it, and your account is cleared to run ads.
If your first campaign will not launch, billing is the first thing to check. It is the step people most often forget, and Meta will not deliver ads without it.
The #1 setup mistake: Your ad account on a personal profile
The most common and costly setup mistake is running your ad account off your personal Facebook profile instead of a Business Portfolio. It happens by accident, it creates real risk, and fixing it later is a hassle, so check for it now.
Here is how it happens. Your first brush with advertising is usually boosting a post or clicking a "create ads" link inside your personal profile. From there, in the words of Stacy Covitz, "Meta, Facebook just takes it upon themselves to create an ad account under your personal profile. And you end up running ads from there." You never chose this setup; Facebook chose it for you.
Why it is a problem comes down to security, limits, and tracking. On the security side, your advertising is tied to your personal login: "If your account gets hacked or locked or anything like that, your whole ad account goes down with it. And there's no separation," Covitz explains.
On the practical side, a personal ad account carries a tiny spending limit and cannot easily take on team members. And your tracking suffers, because "your pixel is basically sitting on your personal account. It's not named. It's not managed. It's not getting the proper data."
How to check if yours is set up wrong:
- Go to and log in at https://business.facebook.com/latest/settings/ad_accounts/
- Click on your ad account.
- Look at the name. If it does not carry your business name and it looks like it is "floating" on its own, it is sitting on your personal profile.The fix is to move your advertising under a proper Business Suite. Set up a Business Portfolio if you do not have one. Your pixel cannot simply be dragged over, so if the old pixel has little data, start a fresh one inside your new Business Suite. If the orphaned pixel does hold data worth keeping, name it first so you can at least identify it while you transition.
🔗 Related article: [How to create a Meta business portfolio](https://www.leadsie.com/blog/how-to-create-meta-business-manager-and-facebook-ad-account#creating-your-first-business-portfolio)
The gold-standard ad account setup (checklist)
A properly built Facebook advertising setup follows a simple structure. Start with a Meta Business Suite account. Have that be the umbrella for everything. Build yours to match this checklist and you avoid nearly every problem above.
- Meta Business Suite as the umbrella that owns everything
- Your Facebook Page and Instagram account connected to it
- One ad account (one per business, unless you genuinely run several businesses)
- Your domain verified, which is not required but always helpful
- Two-factor authentication turned on
- Agencies, admins, and ad managers added cleanly through settings 🔗 Related article: How to give access to a Facebook (Meta) Ad account
Troubleshooting: Cannot find 'Create a new ad account'
If the “ Create a new ad account " option is missing or greyed out, it is almost always one of four reasons, and each has a fix. The button is not broken; Meta is holding it back for a specific cause.
The usual causes are that your portfolio has reached its ad account limit, your account is too new, your business is restricted or unverified, or you do not have full admin access. Work through them in that order.
| Cause | What to do |
|---|---|
| Portfolio hit its ad account limit | Request an increase, or reuse an existing account |
| Account is too new | Wait out the new-account limits, then try again |
| Business restricted or unverified | Verify your business and email in settings |
| You lack full admin access | Ask a portfolio admin to grant you full control |
If none of these apply and the option still will not appear, verifying your business details and email resolves most of the remaining cases.
Want to learn more? Explore our [Frequently Asked Questions](#FAQ) on this topic.
ABOUT THE AUTHOR
Jocelyn Ke
Jocelyn’s background spans UX research, marketing, content writing, and consulting. Outside of work, she enjoys reading, surfing, board games, billiards, Latin dancing, and MMORPGs.
